Unlocking the Secret to Perfect Soft & Chewy Gluten-Free Pretzels at Home
There's a special kind of comfort that comes with biting into a warm, soft, and chewy pretzel, its golden-brown crust giving way to a tender interior. For those navigating the world of gluten-free eating, this simple pleasure often seems out of reach. Store-bought options can be scarce, disappointing, or simply don't hit the mark. But what if we told you that mastering gluten-free pretzels in your own kitchen is not only possible but also incredibly rewarding?
Forget the endless searching through grocery store aisles for a snack that truly satisfies. This guide is your ultimate resource for crafting spectacular, homemade gluten-free pretzels that rival their traditional counterparts. Whether you crave a sweet, cinnamon-sugar delight or a savory, salty classic, this fundamental recipe can be adapted to fulfill every pretzel dream.
The Science Behind the Soft & Chewy Texture
Achieving that coveted soft and chewy texture in gluten-free baking is often perceived as a challenge, but it's entirely attainable with the right combination of ingredients and techniques. The magic lies in understanding how gluten-free components interact to mimic the elasticity and structure normally provided by wheat gluten. Here’s a closer look at the key players:
Crafting Your Ideal Gluten-Free Flour Blend
The foundation of any great gluten-free baked good is its flour blend. While many excellent pre-made gluten-free flour blends are available (often containing a mix of flours, starches, and sometimes xanthan gum), creating your own or understanding its components is empowering. A typical successful blend for gluten-free pretzels often includes a combination of:
- Gluten-Free Flours: Rice flour (white or brown), almond flour, sorghum flour, or millet flour are common choices, each contributing unique flavor and structural properties. An all-purpose gluten-free flour blend can also serve as a convenient base.
- Starches: This is where much of the magic happens! The strategic inclusion of starches like cornstarch and potato starch is crucial. Cornstarch helps to create a tender crumb and a lighter texture, preventing the pretzels from becoming too dense. Potato starch, on the other hand, is a master at adding moisture and that desirable chewiness. Together, they dramatically improve the overall structure and consistency, making your pretzels soft and satisfying. To learn more about how these work in detail, check out our deep dive: Unlock Perfect GF Pretzels: The Science of Starches & Xanthan Gum.
The Essential Role of Xanthan Gum
If your chosen gluten-free flour blend doesn't already contain it, xanthan gum is a non-negotiable addition for most gluten-free yeast doughs, especially for soft gluten-free pretzels. This common food additive acts as a powerful thickener and stabilizer. In gluten-free baking, it remarkably mimics the elasticity and structure that gluten provides, essentially acting as the "glue" that binds doughs and batters together. It helps improve texture, prevents crumbling, and retains precious moisture, ensuring your pretzels are pliable and not brittle. Always follow your recipe's guidance on the precise amount, as a little goes a long way!
Yeast & Stabilizers: The Rise to Perfection
- Regular Active Dry Yeast: For homemade gluten-free pretzels, regular active dry yeast is generally preferred over quick-rise yeast. This allows for a more controlled and gradual rise, which is paramount for developing the right texture and flavor complexity in your dough. A longer, slower proof often results in a more tender and flavorful final product.
- Cream of Tartar: This white powder is a hidden gem in gluten-free pretzel making. As a stabilizer, cream of tartar aids in dough development and texture by enhancing the yeast's effectiveness. It contributes to a more stable dough structure and, surprisingly, helps achieve that desirable crispy crust. If you find yourself without it, alternatives like a small amount of lemon juice or white vinegar can provide similar beneficial acidic effects.
Sweetness & Structure: Butter & Brown Sugar
These ingredients are more than just flavor enhancers; they play important roles in the pretzel's overall appeal:
- Melted Butter: Incorporating melted butter adds incredible richness to your gluten-free pretzels, contributing to a wonderfully tender texture and a depth of flavor that complements both sweet and savory toppings. For vegan versions, a good quality plant-based butter substitute works beautifully.
- Brown Sugar: A touch of brown sugar provides essential sweetness, balancing the flavors in the dough. Beyond taste, it contributes moisture and significantly enhances the browning process during baking, giving your pretzels that beautiful, appetizing golden hue. If brown sugar isn't available, a simple substitute is white sugar combined with a tiny bit of molasses to replicate the flavor and color. For a unique twist, honey or maple syrup can also be used, though they may alter the final texture slightly.
The Iconic Pretzel Bath: Achieving that Golden Crust
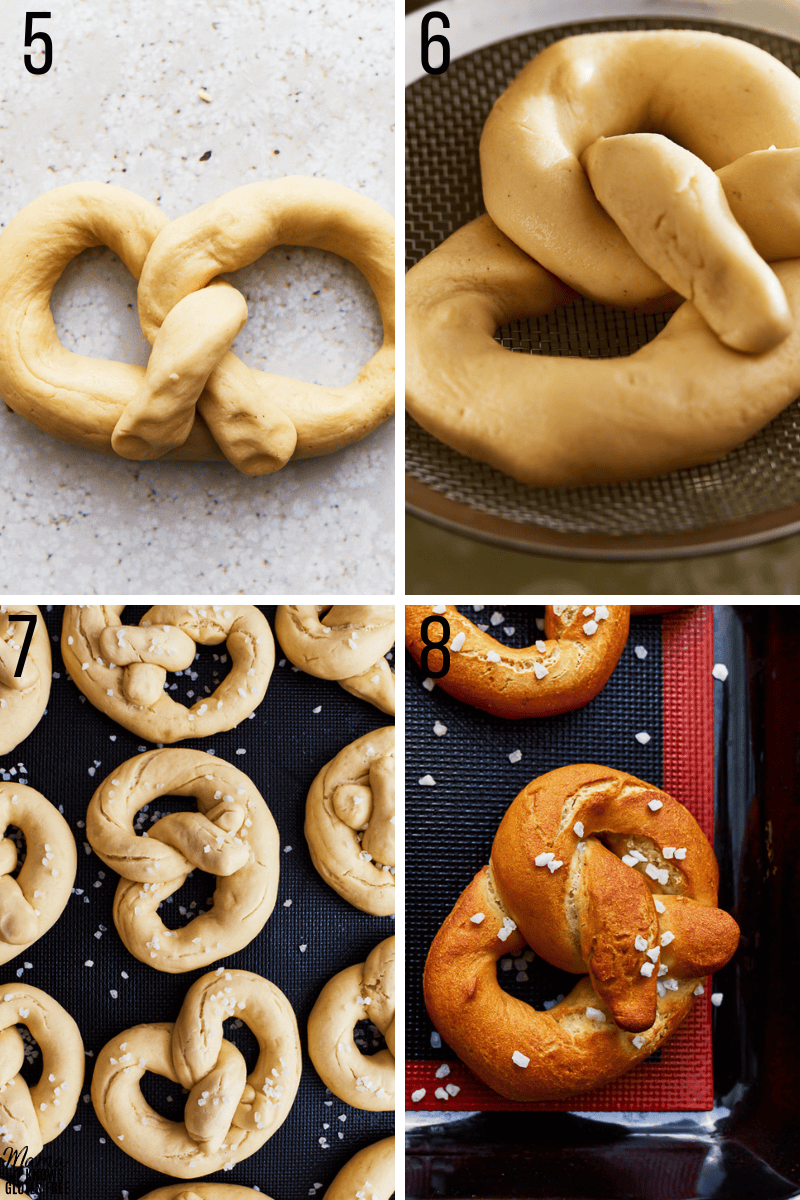
One of the defining characteristics of a truly great pretzel, gluten-free or not, is its distinct deep brown, slightly shiny, and subtly crisp crust. This is achieved through a crucial step: the baking soda bath. Before baking, the formed pretzels are briefly submerged in a hot solution of water and baking soda.
How it Works: The alkalinity of the baking soda solution raises the pH of the pretzel's surface. When exposed to the high heat of the oven, this alkaline environment promotes the Maillard reaction – a chemical reaction between amino acids and reducing sugars that gives browned food its distinctive flavor and color. Without this bath, your pretzels would bake up more like soft breadsticks, lacking that signature pretzel appearance and taste.
Tips for the Perfect Bath:
- Safety First: The water will be very hot. Use a wide, shallow pot or deep skillet to make dipping easier and safer, preventing splashes.
- Gentle Handling: Gluten-free dough can be delicate. Use a slotted spoon or spatula to carefully transfer pretzels into and out of the bath. Avoid overcrowding the pot.
- Brief Dip: Don't over-soak! A 20-30 second dip per side is usually sufficient to achieve the desired effect without making the dough waterlogged.
- Drain Well: Allow excess liquid to drip off before placing the pretzels on the baking sheet.
Shaping, Baking, and Flavoring Your Gluten-Free Masterpiece
Once your dough is perfectly prepared and rested, the fun begins – shaping and customizing your creations.
Shaping Secrets for Gluten-Free Dough
Gluten-free dough can sometimes be less elastic and a bit stickier than traditional dough. Here are some tips for working with it:
- Lightly Flour Your Surface: Use a light dusting of your gluten-free flour blend on your work surface and hands to prevent sticking. Too much flour can dry out the dough.
- Work with Confidence: While delicate, gluten-free dough benefits from confident, swift handling. Don't overwork it, but don't be timid either.
- Roll Evenly: Aim for ropes of consistent thickness to ensure even baking. Inconsistent thickness can lead to burnt thin spots and underbaked thick spots.
- Classic Pretzel Shape: Form a long rope, typically 18-24 inches. Create a 'U' shape, cross the ends, twist them once, and bring them down to meet the bottom curve of the 'U'. Gently press to secure the ends.
- Alternative Shapes: Don't feel limited! Pretzel bites or sticks are much easier to shape and just as delicious, perfect for beginners or a quick snack.
Baking for Golden Perfection
Preheat your oven thoroughly, ideally to a higher temperature (around 425-450°F or 220-230°C), and ensure your baking sheets are lined with parchment paper. High heat helps to set the crust quickly and achieve a beautiful golden-brown color. Bake until the pretzels are deeply golden and sound hollow when tapped on the bottom. Don't be afraid to let them get a good color – that's where much of the flavor and desirable crisp-chewy texture comes from!
Endless Customization: Sweet, Savory, and Beyond
This is where your homemade gluten-free pretzels truly shine. Their versatility allows for an incredible array of toppings:
- Classic Savory: A sprinkle of coarse sea salt immediately after the baking soda bath is iconic. Pair with classic mustard, a warm cheese sauce, or even a simple vegan cashew queso.
- Sweet Delights: Brush warm pretzels with melted butter and generously dust with cinnamon sugar. For extra indulgence, add a drizzle of cream cheese glaze, chocolate sauce, or even a fruit dip.
- Herby & Cheesy: Before baking, sprinkle with a mix of garlic powder, onion powder, and grated dairy-free or regular Parmesan cheese for an aromatic treat.
- Everything Bagel Style: Apply everything bagel seasoning after the bath for a fantastic savory twist that mimics your favorite breakfast bread.
For more inspiration on how to adapt your pretzels to various tastes, including delicious vegan options, explore our guide: Easy Gluten-Free Pretzel Recipes: Sweet, Savory, & Vegan Options.
Essential Tips for Gluten-Free Pretzel Success
Even with the best recipe, a few general tips can elevate your gluten-free baking game and ensure consistent, delicious results:
- Accuracy is Key: Gluten-free baking is often more precise than traditional baking. Use a kitchen scale for flours and starches for the most consistent results, as volume measurements can vary widely.
- Room Temperature Ingredients: Ensure dairy products (like butter, if using) and liquids are at room temperature to help the yeast activate properly and integrate smoothly into the dough.
- Don't Rush the Proof: Allow your dough sufficient time to rise in a warm, draft-free place. A properly proofed dough is lighter, more tender, and will have better texture.
- Oven Calibration: Ovens can vary significantly. An oven thermometer can help ensure your oven is truly at the temperature you set, which is critical for proper baking and preventing burnt or undercooked pretzels.
- Enjoy Fresh: Like most homemade baked goods, especially yeast-based ones, gluten-free pretzels are best enjoyed fresh, warm from the oven. They can be stored in an airtight container for a day or two, but their texture is peak right after baking.
Conclusion: Your Homemade Gluten-Free Pretzel Journey Awaits
Embarking on the journey to make your own soft and chewy gluten-free pretzels at home is a decision you won't regret. It's an opportunity to reclaim a beloved comfort food, customize it to your heart's content, and enjoy the satisfaction of a truly homemade treat. With a little understanding of key ingredients like specialized flours and starches, the binding power of xanthan gum, and the transformative effect of the baking soda bath, you'll be shaping, dipping, and baking perfect gluten-free pretzels in no time. So, gather your ingredients, clear your counter, and prepare to delight your taste buds with these incredible gluten-free creations!
